May 2021

World Premiere Review!
Charisma Audio Musiko Tonearm, Soundeck, And Audio Machina Accessories
A killer combination forced me to overcome my fear and buy the review sample.
“The more one knows about audio, the more one understands the imperfection.”
— Bernard Li
Just when I thought I was done with my Linn Turntable Project, Bernard Li of Charisma Audio called and asked if I’d like to try his new Musiko tonearm, which conveniently was already on the USA side of the border. George Merrill had been playing with it on his new Gem Dandy PolyTable down in Tennessee. Bernard knew I was impressed with it when I saw it at the last Toronto and other shows during 2019. Dropshipping it from George would save two border crossings and give me a chance to hear it.
Let’s Go!!!
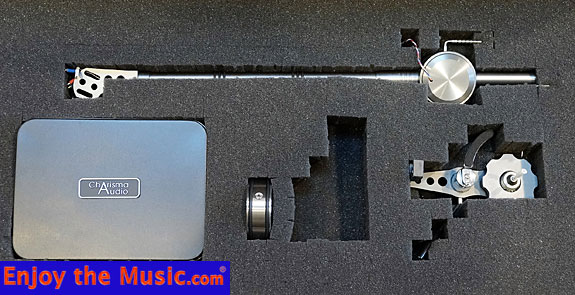
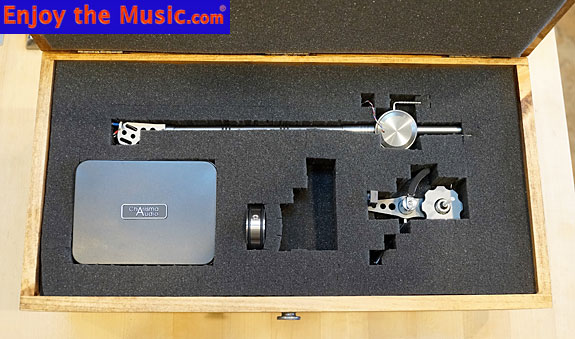
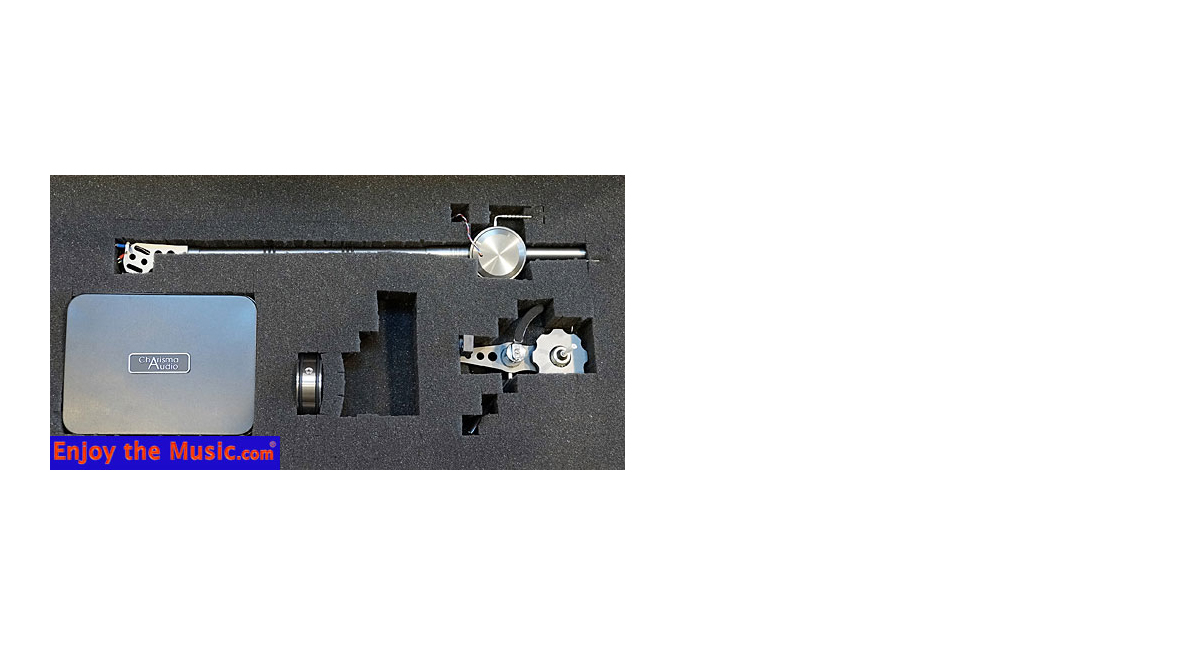
Charisma Audio’s Musiko arrived in a well-crafted wooden box. Inside, the various components and tools were neatly partitioned in foam. A long Plexiglas measuring tool was taped to the outside bottom of the box to be used in measuring and drilling a blank arm board to the proper specs. The 9.33″ tonearm has a 222mm pivot to spindle distance, same as a Rega, but you will need to enlarge the main hole on a Rega table and drill new holes to mount the flange. Specs are below the review for analog gurus, but suffice it to say the Musiko is designed to accept 95% of all cartridges.
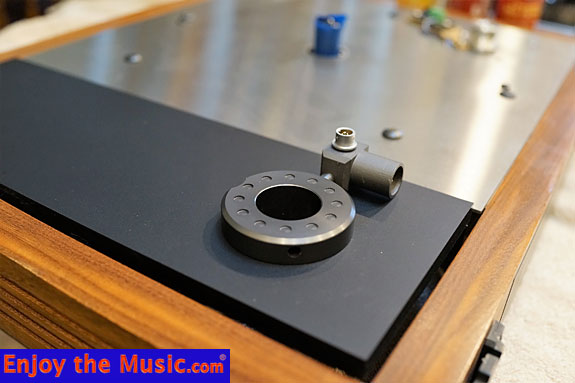
Since the Jelco sourced Sumiko MMT tonearm required special drilling on the Stack Audio arm board of my hyper-modded Linn turntable, Bernard graciously drilled out a new acrylic arm board for me. The top surface was a matte black finish which nicely complemented the satin gray anodized finish of the Musiko. Very cool!
The Sumiko MMT has a captive tonearm cable, so Bernard sent along his new Charisma Audio Musiko tonearm cable with a straight DIN connection to plug into the Musiko tonearm on the top side of the arm board. There was sufficient clearance to avoid contacting the wood plinth. This arrangement eliminated the need to carefully attach the captive tonearm cable with the plastic P-clip inside the plinth. The cable simply shot off the back of the turntable and dropped down to the Coincident phono stage below. The internal cabling of the tonearm itself and the DIN connector is sourced from Cardas.
Overall, mounting the Musiko was straightforward and relatively easy. The instruction manual is complete and detailed with color photos. It begins with instructions on drilling out a blank arm board using the included pivot-to-spindle measuring device and circular template for the tonearm collar. From there, steps 6 through 12 walks you through the entire process, followed by five additional photos with notes on fine adjustment of tracking force, VTA, and Azimuth.
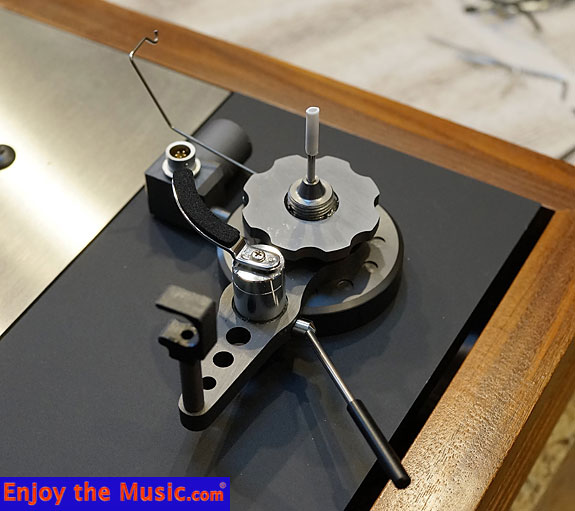
Only the note on Damping was unclear. Built into the housing that surrounds the ultra-sharp vertical pin is a small brass disk that rests atop the pin and a ring magnet. The magnetic field reaches down to an adjustable disc threaded onto the main pillar that supports the needle bearing. Raising and lowering this disc (see above) adjusts the magnetic damping that controls the amount of micro-wobble induced in the tonearm by the stylus screaming through the groove of the LP. That sharp pin, by the way, is replaceable, but it is unlikely ever need it.
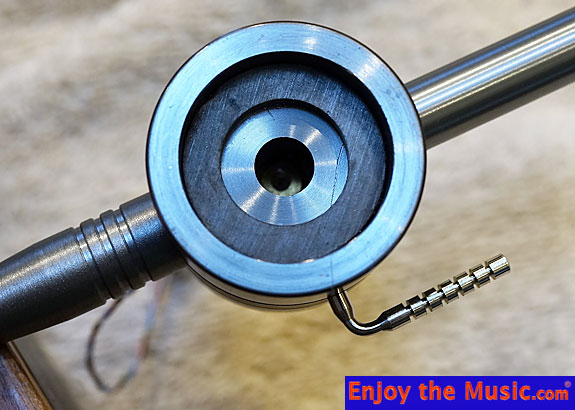
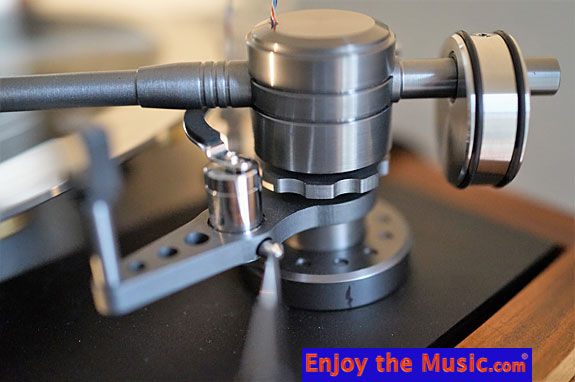
I’ll admit I was not a big fan of uni-pivot tonearms. Between my clumsy fingers and my compromised vision in one eye, they make me nervous. My previous experience with them was on the Kronos Sparta as reviewed here with their Helena tonearm, a very nice ball and cup design, and a VPI tonearm on a buddy’s Scout. The Sumiko MMT (and Jelco tonearms) use bearings for both vertical and horizontal movement. I’ve loved its simplicity and reassurance. But once I heard the Musiko I knew I had to learn to master this uni-pivot design.
The Design
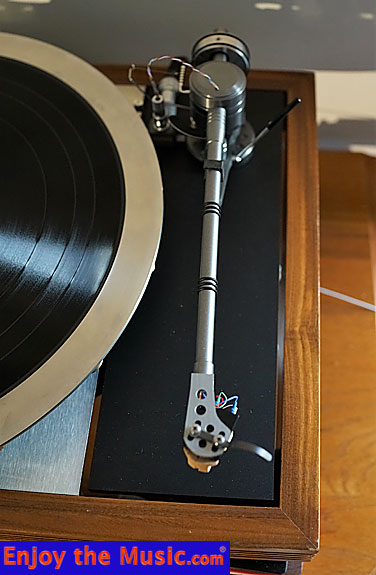
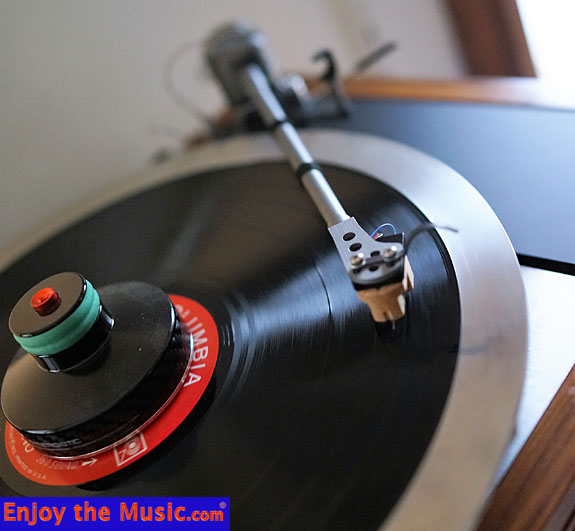
Coming from the home furnishing industry, I’ve argued from day one that visual design matters, regardless of whether you’re willing to admit it or not. The Musiko is very strong in this regard with well-thought-out details that integrate functional design with style. The arm tube is comprised of two sections of different diameter aluminum to minimize vibrations in different frequency ranges. Two sets of three black O-rings are positioned to damp resonance along the arm tube. Two black O-rings grace the counter-weight as well, providing a secure grip when making adjustments. Counter-sunk inside the back end of the arm tube is an adjustable set screw to fine-tune vertical tracking force with the included 2mm Allen screwdriver.
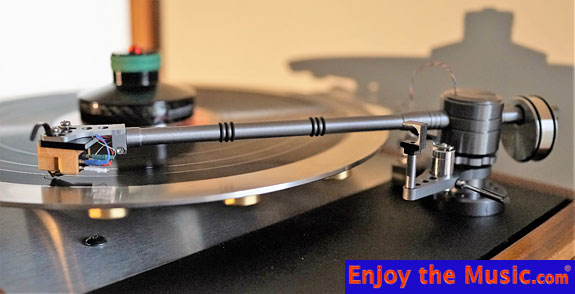
The straight form of the armtube, as opposed to the S-shape of the Sumiko, lends a visual impression of strength, though neither are likely to ever break. A big benefit of the straight design was that it made placement of the LP peripheral ring a lot easier and less stressful — more clearance. My turntable is wall mounted at shoulder height which makes cueing up the LP and individual tracks a lot easier, but the placement of the periphery ring is a bit more challenging than if the turntable were lower. The offset angle of the integrated headshell is 21.6 degrees for proper cartridge alignment. It is drilled for lightness, which also saves a gram or two and adds visual interest. A curved finger lift is attached to the top of the headshell with the screws used to mount the cartridge.
Overall, the Musiko achieves a unique look with a much more substantial appearance than the Sumiko arm it replaces. Touches of black at various points visually break up the fine anodized finish contributing to the visual interest. It is a very handsome design that fits in well with the unique styling of the Bard turntable.
The Set-Up
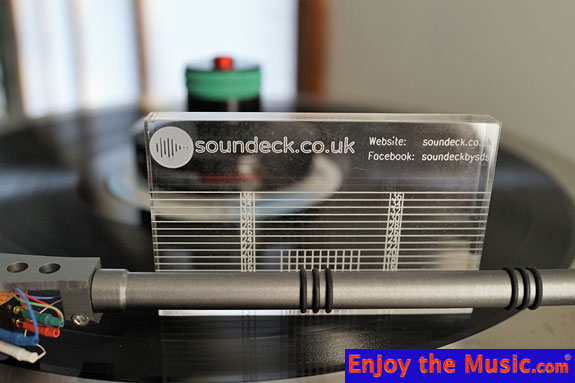
Setting up the Musiko was greatly facilitated by the use of a Soundeck VTAA Vertical Tracking and Azimuth acrylic alignment tool sent by Les Thompson (£10). At 5/16″ (8mm) thick it stands upright on the LP directly in front or behind the tonearm as it rests on the record. The horizontal lines scored in the acrylic are spaced 2mm apart and numbered from 2 to 36 mm. This made it very easy to recognize whether the tonearm was parallel to the record surface or not. Raising the tonearm itself involved a little more guesswork as it involves loosening the 2mm set screw, then estimating when you’ve raised or lowered it by the amount measured with the tool. It usually took me a couple of attempts to get it right. I had to remake this adjustment numerous times to evaluate the Audio Machina V8 which I’ll get to shortly.
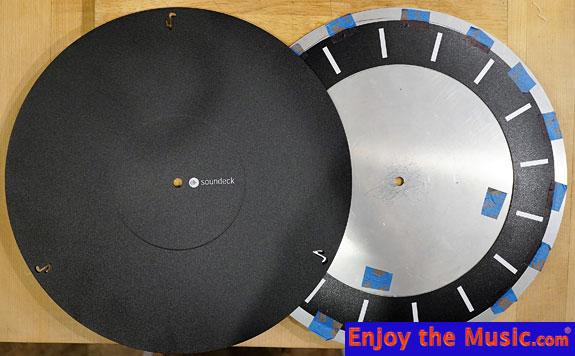
Les also sent along with his new Soundeck mat complete with eighth note symbols laser-cut near the circumference. These are available in several thicknesses and diameters to accommodate the replacement of OEM mats. They are comprised of two layers of aluminum with a visco-elastic polymer sandwiched in to absorb micro vibrations. The silver one on the right is the one I use in place of the Linn outer ring. It is made with stainless steel and has a slightly cooler sound than the aluminum ones now offered. The ring taped to the bottom is read by the Mober tachometer for very precise speed adjustment by the DC motor. I’ve highly recommended the Soundeck mats before and the latest version is even classier look. Now, getting back to the tonearm set-up…
Azimuth is adjusted by loosening the set screw on the eccentric counterweight and rotating it slightly, then re-tightening it. It is best to use a magnifying glass to adjust the stylus itself so it is vertical in the groove. For further verification, you could take a photo with a good camera with macro capability and enlarge the image on your computer screen, or even the screen on the camera itself, if possible. What you want to avoid is judging azimuth by assuming it is correct if the top of the headshell is level. As my buddy Tom Lathrop pointed out:
The trouble with getting the headshell level is that it’s not unusual for the cantilever to be slightly rotated, or for the stylus to be mounted slightly askew. Those things are really tiny, and I think that they’re done by hand. So there’s no guarantee that it’s always done perfectly.
Ideally, when the stylus is vertical, the output of the channels will be equal and you will achieve the widest possible channel separation, and therefore the widest possible soundstage. However, in real life, the output of the left and right channels of a cartridge is not equal. I asked Bernard about using meters to balance the outputs:
The main reason why I don’t like to use the meter to adjust the azimuth is because it sometimes ends up having the stylus sitting at an angle instead of straight down. I don’t want my precious records to be tracked that way. I would rather accept a slight left and right channel imbalance on the outputs and a slightly narrower soundstage.
Bernard has a long history of involvement with analog playback going back to his early days as a reviewer in Hong Kong when it was a British colony and I trust his advice. Not only has he developed a handful of different cartridges and a phono stage, but his new turntable is nearing completion.
Anti-skating is accomplished by the familiar method of looping a weight attached to a bar over a hook near the pivot end of the tonearm. The nylon loop slides into one of several notches on a bar parallel to the tonearm, then drapes over a hook, leaving the small weight suspended in the air. The nylon loop was so small it was frustrating to position it in the correct notch when using just my fingers. Some experts say this is not important on a uni-pivot tonearm and when I played some LPs without the weight attached, I was unable to notice a difference. Eventually, it occurred to me to use some tweezers to hold the nylon line. Indeed, this made it much simpler. It is not an adjustment you are likely to make a second time once you have it properly set unless you are changing cartridges frequently.
Horses For Courses
Since 2017 I’ve been using the Audio Machina V8 Broad-Spectrum Cartridge/Tonearm Vibration Absorber, a high-tech metal wafer I wrote about in the Great Audiophile Gift Guide in the December issue. This little four gram device, costing $398 transformed my analog playback. It would be unfair to compare my Sumiko tonearm with the V8 against the Musiko without the V8. So, with a lot of swapping and tonearm adjustment (remember the Soundeck VTAA mentioned above?) I compared the tonearms with and without the V8. You can see the black V8 mounted between the cartridge and the tonearm in some of the photos.
I’ll cut right to the results here and say if money is tight and you’ve only got $400, run right out and buy an Audio Machina V8. If you’ve got $2500 to spend, and need or want a new tonearm, go for the Charisma Audio Musiko tonearm. But what you really want to do is spend $2900 for both. Starting with the bare Sumiko arm, adding the V8 got me most of what I heard from upgrading the bare Sumiko to the bare Musiko tonearm. Putting the Musiko together with the V8 put the music up there with tonearms costing $6000 (and perhaps more) on turntables that cost in the neighborhood of $30,000. Of course I’m cutting some slack (but not much) for the fact that these more expensive tables were running cartridges in the $4000 to $12,000 range against the Charisma 103 phono cartridge as reviewed here, which is a highly modified Denon DL 103 MC cartridge with a line contact stylus and a ruby cantilever, that costs $750.
The entire Audio Machina operation almost went up in smoke in a forest fire on a ridge high above Loveland, Colorado, last summer. Having visited Dr. Karl Schuemann, the man behind Audio Machina on a trip to Rocky Mountain Audio Fest, I knew exactly where he lived and watched the fire reports as they came in on the internet. It got so scary I phoned him to see if he was still alive. Fortunately, the fire was stopped by a dirt road bordering open pasture land only a quarter of amile down the hill from his place. Dare I say “Get your V8’s while they’re hot”?
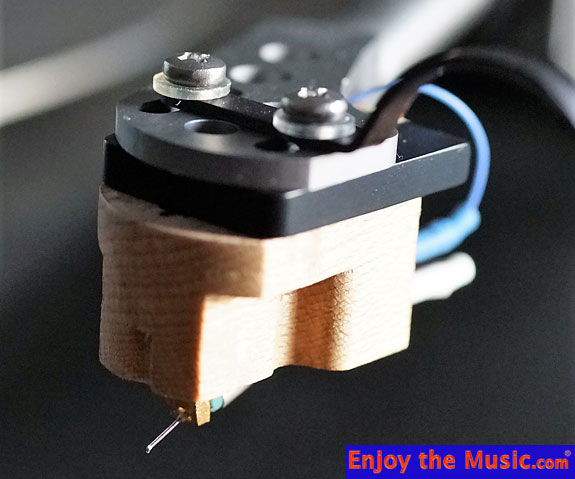
Having recently viewed a LAOCAS Zoom meeting with guest speaker Peter Ledermann of Soundsmith fame, I was concerned about adding the extra weight between the cartridge and the tonearm. I knew there were specific parameters between cartridge weight and the effective mass of a tonearm. And something about a resonant frequency that should be respected. With the Sumiko arm, I just added the V8 with the Charisma 103 and let it fly. Everything sounded so much better I assumed I had not violated any laws of physics. Same thing with the Musiko. But in the interest of spreading the truth, I asked Bernard to clarify the science. He replied:
From 8 to 12 Hz is the ideal resonance frequency range with the combination of tonearm and phono cartridge. High compliance cartridges like to see a low mass tonearm and low compliance cartridges like to see a high mass tonearm in order to reach the ideal resonance frequency range.
My [Musiko] tonearm is a medium mass tonearm. It has an effective mass of about 12 grams. My 103 cartridge is considered a low compliance cartridge with a dynamic compliance of 7 um/mN. It works well with medium to high mass tonearms. That’s why that extra 4 grams of weight of the vibration damper is fine for my 103 cartridge.
My tonearm works with cartridges weighing from 5 to 17 grams, which covers over 95% of cartridges on the market. A very heavy cartridge or a cartridge with very low compliance should work with a high mass tonearm.
The Charisma 103 cartridge weighs 8.8 grams. It was reassuring to know I was not violating the science.
Breaking The Rules
The Golden Rule for audio reviewers is to change only one variable when reviewing audio equipment. My Sumiko tonearm had a captive cable running from the bayonet mount for the removable headshell to the RCA inputs of my Coincident phono stage. So I would need a new phono cable. The mounting position of the Musiko was also different than the Sumiko, so I needed a new arm board, too. I was not in an apples-to-apples position, so I had to fall back on the other Golden Rule: He with the gold, rules. I put myself in the position of the prospective customer and asked myself the usual questions:
Do I like the way it sounds?
Do I like the way I functionally interact with it?
Do I like the way it looks with the turntable and my other gear?
Is this a ‘forever’ component (and if not, will I be able to re-sell it easily)?
First, Do I Like The Way It Sounds?
Yes, yes, and yes.
While I thought the Sumiko with the V8 was pretty darn good, sometimes you don’t know what you’ve got until you get something better…and this was the case with the Musiko. But the story is a little more complex.
When I realized I needed a DIN to RCA phono cable I requested a review sample from Synergistic Research’s Foundation series since the rest of my interconnects and speaker cables were from this series. It arrived in about a week via FedEx. Shipping from Canada was problematic. Parcel post packages were running up to three months late due to a log jam at the parcel handling facility in Rochester, NY, in the run-up to the holidays. (I have voodoo dolls for certain political figures.)
Bernard ships via Canada Post and his Musiko tonearm cable arrived January 10th, a month after he sent it. (I got lucky.) By this time the Foundation cable was well run in and sounding very good. There was a noticeable improvement in resolution across the board, but more noticeable in the bass and treble in comparison with the Sumiko. Switching over to the Musiko cable required more run-in time. Once satisfied that it was at least near peak performance, I compared it directly with the Foundation. I could live happily with either cable if I hadn’t compared it with the other. The overall performance was way above the Sumiko MMT.
The Musiko tonearm cable offered a slightly higher resolution, particularly in the treble, and more tonal color throughout. I was able to dig deeper into the music and become a little more emotionally involved with the Musiko. I want to say the music was more present, but this should not be interpreted as a boost in the presence range. The music sounded pretty much the same as before, just better, and made me want to listen to it more.
Both cables were well made and flexible. The Foundation was comprised of two separate cables, combined at the DIN plug, each with its’ ground wire to connect with the binding post on the phono stage. This was a little atypical, but not difficult to attach. The Musiko has a single ground spade that was small enough to be used under a chassis screw, but too small to surround the ground post. Nonetheless, it was easy to attach it there. My biggest fear was that it was going to cost in the neighborhood of $1200. I purposely asked Bernard not to tell me the price of either the Musiko tonearm or phono cable until I had made my observations, formed my opinions, and started writing the review. (I had published the price of the tonearm in my show reports, but that was pre-Covid. Numerous synapses have become dysfunctional in the interim.)
Adding the Audio Machina V8 to the Musiko tonearm nearly doubled the improvement I experienced in upgrading from the Sumiko MMT to the Musiko. As I alluded above, I felt like I was in the league of very expensive analog rigs with the combination of the Musiko tonearm, cable, and Audio Machina V8. Here again, the overall sound character of the system did not change significantly, aside from the very obvious improvement in resolution. After all, that’s what a broad-spectrum cartridge/tonearm vibration absorber is supposed to do. As good as it all was, now, the most perceptible shortcoming was now in the deep bass.
Asking the 9″ woofer on my Kharma speakers to move that much air in a 6000 cubic foot room, with a huge opening to the adjacent family room, is overly optimistic. The effective platter weight of the Bard is close to the Linn, so this is not a high mass turntable. The resolution is much better than with the original OEM Linn outer platter, but finding a way to incorporate a heavier platter would likely help. The next speaker I have coming in for review will help me sort out the answer to the question of deep bass in the 20 to 35Hz range.
Adjustable Damping
The adjustable damping feature was ambiguous so I leaned on Bernard for some coaching. Here’s what he said:
If you bring the adjustable disc closer to the ring magnet (narrowing the gap), it will increase the damping. The opposite will decrease the damping. Play around with the adjustable ring in order to obtain the best performance.
I selected my most familiar reference cut, Jackson Browne’s “The Load Out / Stay” and listened over and over as I alternated between the ring dialed up toward the pivot point and the ring dialed down toward the arm board. In the uppermost position, the music was tight and had greater resolution. The soundstage seemed a little narrower and the ceiling was also lower. There was less sound of the venue on this live recording and the audience clapping was more subdued.
Lowering the damping ring opened up the sound with more ambient cues from the venue, giving a better sense of the size of the audience from their applause. There was more air in the music, with a greater sense of the height of the venue. Also, greater soundstage width. There was slightly more dynamic contrast. And a little less focus, particularly in the cymbals. There was a little more transparency and the recording felt a little more live, in contrast with the more damped presentation which felt a little more like a studio recording.
I suspect a lot of the effect of adjusting the damping will depend on the specific recording and perhaps the compliance and resolution of your cartridge. While it is relatively easy to turn the disc, it is not something you will want to do with every record. If you never touched this adjustment, you would still love the tonearm, but at this level of performance, you will probably delight in discovering the difference it makes. Most likely you will play around with it until you find a happy medium and just leave it there. Some other uni-pivot tonearms use a silicone or oil bath to damp the tonearm. Sure, you can alter the damping by using different viscosity oil, but how much fun and mess is changing oil going to be?
Another unquantifiable variable was the difference between the Stack Audio arm board I used with the Sumiko arm and the solid acrylic arm board Bernard supplied. Stack Audio now supplies newer generation arm boards in both acrylic and aluminum for Linn and Rega arms. I suspect the acrylic arm board I am now using is in the same league as my older Stack arm board.
Do I Like The Way I Functionally Interact With It?
I mentioned my insecurity with the uni-pivot design earlier, but the improved sound quality I achieved with the Musiko encouraged me to learn to love it…and I’m pretty much there. I still have a few quibbles with it, like the way the tonearm rolls and moves back toward the outer edge of the record when the tonearm is lowered. This makes it more difficult to hit the open groove area between songs, but I’m learning to become less annoyed with this.
Like learning to ride a bike, the more I use it, the easier it becomes. When I first began using the periphery ring it was a royal pain to get it positioned properly. Now, I get it right 99% on the first attempt.
I enjoy listening in the dark, though I turn a small reading light on at the listening chair when it comes time to change the record. Still, it is difficult to spot the tonearm lift lever and the finger lift at the end of the tonearm in dim light. A simple brush stroke with some white nail polish will probably alleviate those problems. I also appreciate the use of a curved finger lift as it integrates stylistically and it is easier to use than the flat style.
If you’re putting this tonearm on a Linn turntable, you will have to forego using the dust cover as the arm is a bit too long at the back and the lift lever sticks out a tad too much at the side. Most high-end audio turntables in this league don’t have dust covers, and I haven’t been using one with my Linn since I started modifying it, so this is not a problem for me. If you have concerns about fitment on a specific turntable, it wouldn’t hurt to check with Bernard.
The tonearm catch on the resting post does a reasonably good job of securing the tonearm at rest but it is not secured the way the snap-lock mechanism does on the Sumiko. In everyday use, it has a quality feel and is perfectly adequate. If I were to transport the table in a car, I would have to secure the arm to the post with some tape or a twist-tie, but obviously, this is not a deal-breaker.
Do I Like The Way It Looks With The Turntable / Other Gear?
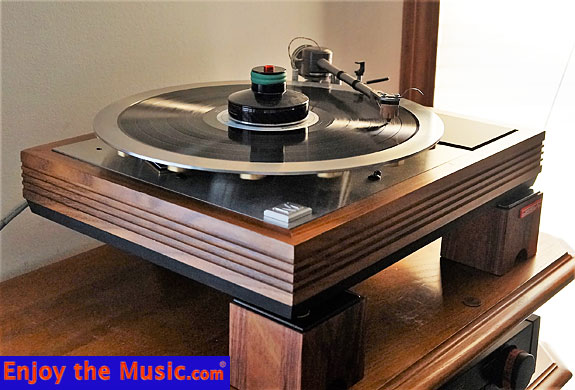
The only OEM parts left from my original Linn LP12 are the wood plinth, the belt, springs, grommets, and suspension bolts. That’s why I’ve re-christened it The Bard. It has a hint of steampunk technology with the thin platter and the two-tone periphery ring, but this is softened by the wood plinth. The Musiko fits in right between these two design elements and ties them together. I’m very satisfied with the look and I can imagine the Musiko would be right at home on a wide range of today’s turntables as well as many vintage ones. It will likely make a lot of more basic designs look a lot richer.
Is It A Good Value?
Scanning the offerings within other publications’ component lists reveals few tonearms in what amounts to the “mid-range”. My blind guess of the retail price before I finally asked was $3500 — and that was with my personally acquired knowledge that Bernard Li offers exceptional value with his offerings. This is not the first product I’ve reviewed from Charisma Audio. And I’m not the only reviewer who feels this way. When he told me that he sells it for $2500 I was impressed with the value, but not surprised by the modest cost.
Another way to determine value is to compare the way a product sounds with what you’ve heard before. I’ve mentioned above that it sounds like it belongs in a much more expensive league, though it may not have the ease of adjustment of pricier tonearms.
As a mid-priced tonearm, it seems aimed at people seeking to upgrade a more modest or older turntable, and not likely someone who has multiple cartridges to play with. On the other hand, it may make perfect sense for someone with a very expensive table that accepts multiple tonearms. Someone might be looking for a more modest arm to use with a less expensive cartridge as a daily driver. (I’m thinking about myself here with a lot of hand-picked garage sale LPs.)
Regarding the Musiko tonearm cable, I said earlier that I thought it might cost $1200, given the typical industry markup in this category. I was very pleasantly surprised to hear that it goes for $500, considering the significant contribution it makes and the pre-determined decision I had made to purchase it along with the tonearm.
Is This A ‘Forever’ Component
And if not, will I be able to re-sell it easily?
As a reviewer, I’m never sure of all the products that lie ahead. I thought the Codia Acoustics rack I bought from Bernard after the review would be a “forever” component, but two and a half years later they came out with a better one…and it’s a beauty (the Codia Acoustic Design Stage 3000 Diagon equipment rack as reviewed here). My gut feeling is this could easily be my “forever” tonearm given that it completes the makeover of my Linn turntable and it’s in a price range I’m comfortable with.
There are other equipment categories I want to explore to balance out my system. But I’m not saying this will be my last tonearm review. Bernard is young enough and still an active designer so that the Musiko brand is likely to be around and in demand for a couple of decades. Plus, his new turntable will likely debut this year which will create even more exposure and demand for the tonearm.
As for the Musiko tonearm cable, I’m not likely to spend more money on a new one unless a new tonearm requires a different cable. This is a very revealing cable without any irritation at a price that feels like the sweet spot in the cable industry right now. If it can tame the ‘S’es on a Paul Simon LP, it’s a winner. It’s such a great value that I asked Bernard if he was coming out with interconnects and speaker cables to match. Being the analog fanatic that he is, he said no.
Miracles Happen
You’re not supposed to be reading this because my editor told me not to write any more articles about a tweaky 1972 turntable design. After all, Listener Magazine‘s Art Dudley sold off his old Linn decades ago. There are only a few fossils left at other publications that still use one. I couldn’t restrain myself. This is a world premiere review of a great new relatively affordable tonearm that is so good I figure a brand-new turntable couldn’t be far behind.
In a world awash with $500 (and less) turntables there is bound to be an uptick in interest in better turntables as younger and middle-aged music lovers ascend the economic ladder. For those seeking to upgrade either their existing turntable or re-hab a vintage machine, there are precious few mid-priced options. Granted, this is more expensive than anything the now-defunct Jelco was putting out, but it is also better sounding and a much more handsome design.
I’ve been skeptical about the ergonomics of uni-pivot tonearms, but with the modest addition of the Audio Machina V8 vibration absorber, this killer combination forced me to overcome my fear and buy the review sample. While it lacks a feature or two of some of the traditional heroes in this category, it comes close enough in sound quality that I will enjoy the music a whole lot more than if I had spent three times as much.
| With AM V8 | ||
| Tonality |  | |
| Sub–bass (10Hz – 60Hz) |  | |
| Mid–bass (80Hz – 200Hz) |  |  |
| Midrange (200Hz – 3,000Hz) |  |  |
| High Frequencies (3,000Hz On Up) |  |  |
| Attack |  |  |
| Decay |  |  |
| Inner Resolution |  |  |
| Soundscape Width Front |  | |
| Soundscape Width Rear |  |  |
| Soundscape Depth |  |  |
| Soundscape Extension Into Room |  |  |
| Imaging |  |  |
| Fit And Finish |  |  |
| Self Noise |  |  |
| Value For The Money |  |  |

Check out Enjoy the Music!
See many great reviews by Enjoy the Music.com at this link.
Specifications
Type: Tonearm for vinyl LP turntable
Bearing Type: Uni-pivot
Total Mass: 1100 grams
Effective Mass: ~12 grams
Total Length: 297 mm
Effective Length: 237 mm
Mounting Distance: 222 mm
Overhang: 15 mm
Offset Angle: 21.6 degrees
Cartridge Weight: 5 to 17 grams
Limited Warranty: Limited, one year against defects in material and workmanship
Price: $2500
Company Information
Charisma Audio
Suite 86, Unit A14
4261, Highway 7
Markham, Ontario
Canada L3R 9W6
Voice: (905) 470-0825
Fax: (905) 470-7966
E-mail: charisma@rogers.com
Website: CharismaAudio.com
Audiomachina Inc.
15850 Steller Ridge Road
Loveland, CO 80538
Voice: (970) 412-1718
Website: AudioMachina.com
Soundeck
Website: Soundeck.bigcartel.com



Leave a Reply
Want to join discussion?
Feel free to contribute!